Step 1 - Find The Lesson Link
There are 2 places in your account that you can find your lesson link.
Here's a quick video to help you find your link, or follow the steps below for more information.
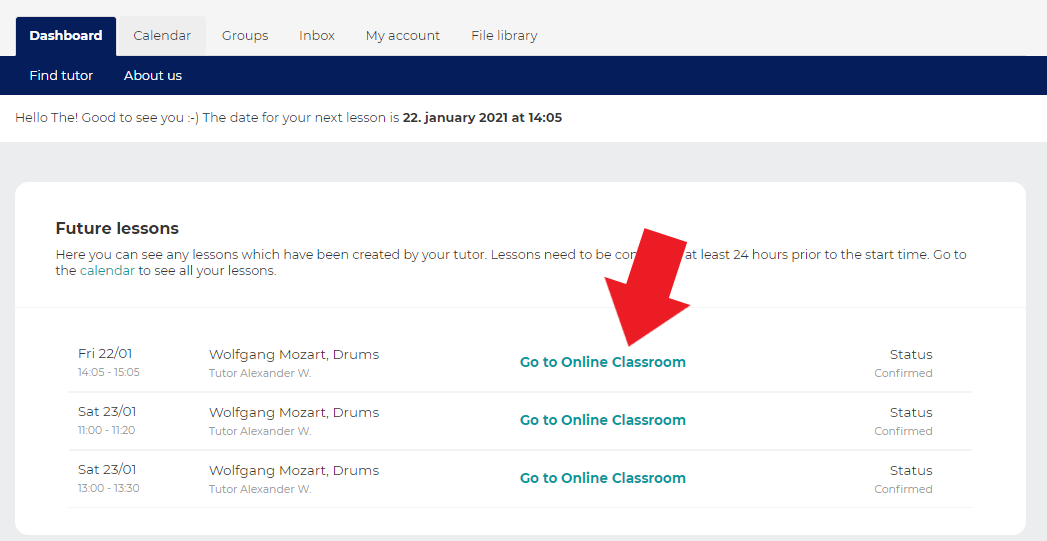
1 - Dashboard
Log in to musictutors
Scroll down to the block titled ‘Future lessons’
Here, you will see that next to your name, it says ‘Go to Online Classroom’ in green.Simply click the link to start your lesson. Note that the link will only open 2 hours beforeyour lesson.
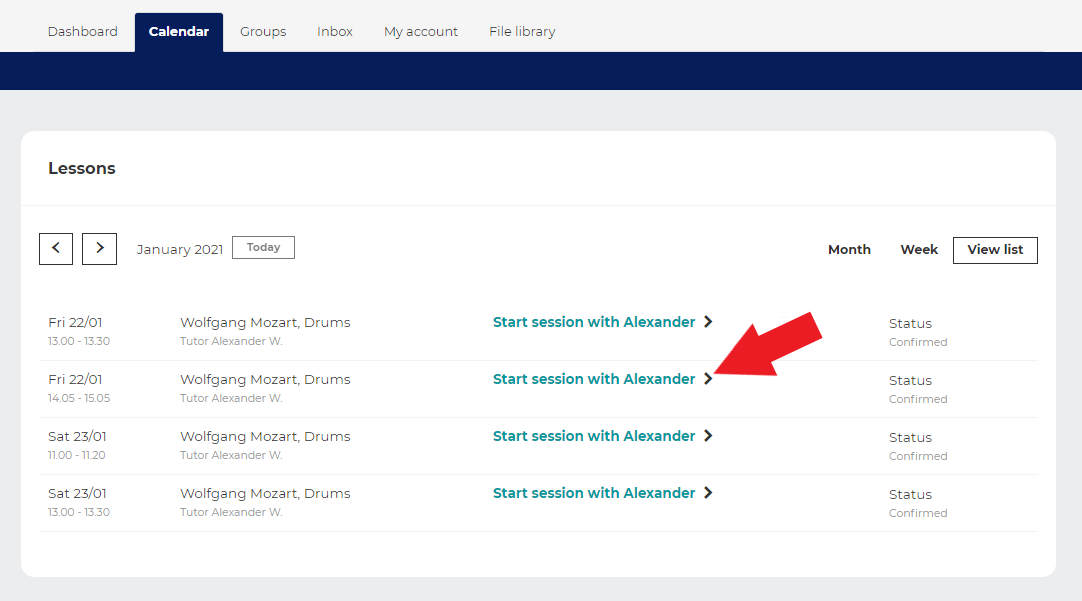
2 - Calendar
Log in to www.musictutors.co.uk
Navigate to your calendar by clicking the ‘Calendar’ tab at the top of the page.
Here, you will see a list of your lessons. Next to each is a green link that says ‘Start session with [teacher’s name]’.
Simply click the link on the lesson you want to start! Note that the link will only open 2 hours before your lesson.
We advise that you click on the lesson link at least a few minutes before the lesson is due to start. This is so that you can make sure everything is working ok before you start. If you have any problems, make sure you check our Troubleshooting Guide.
Step 2 - Inside the Online Classroom
When you enter the lesson, you’ll notice there are several icons at the bottom of the screen. They are as follows:

Video and Audio Quality - Click this to access video & audio quality settings. You can toggle between high quality / HD and low quality / SD for both audio and video. Keep in mind that high quality will use more bandwidth, so if the connection quality is poor on either end of the call, you may find that low quality / SD works better.
Microphone - You can click this icon to turn your microphone on and off.
Metronome - Click this icon to use our built-in metronome. You can set the time signature, how many beats per minute and turn it on and off - both of you will be able to hear the metronome.
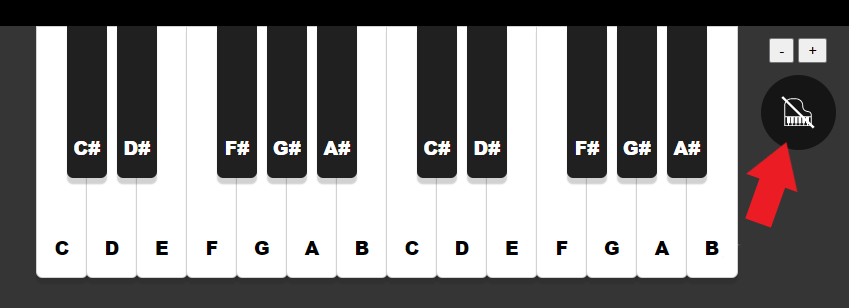
Piano- Clicking this brings up an on-screen keyboard which you and the tutor can play by tapping, as well as using the top two rows of your keyboard, if on desktop. Press the piano icon next to the keyboard to mute it.
Whiteboard- Use this to bring up an on-screen whiteboard which you and your tutor can draw on. Please remember that your tutor can see everything you write! Also, note that clearing the whiteboard will do so for both parties.
Screen Share - Use this button to show your screen to your teacher. This could be useful if you want to show your teacher some sheet music on your computer, or the webpage for an instrument you are looking at buying.
Chat Window - Use this to open the chat window for the lesson. You can use this to communicate while fixing a sound issue, for example. This data is deleted at the end of the lesson, so if you’re sending any lesson notes etc., we recommend doing so through your account Inbox instead.
The online classroom will work with just your inbuilt camera and microphone if your device has them, but if you do have extra equipment you would like to use - we have made this very simple to set up. To check your audio and video settings, use the cog button in the bottom right corner.
When you click this, you’ll see a subsequent menu appear:
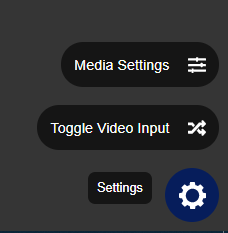
Media Settings - In here you will find audio and camera settings:
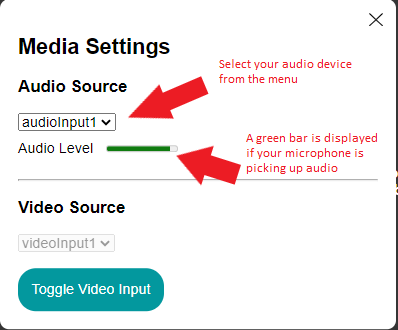
Audio Source: Our classroom works with any USB audio device, for example - an audio interface; an external USB microphone; a USB keyboard with audio inputs etc. Please ensure that all your audio equipment is connected before you start your browser and enter the classroom. Use the drop-down menu to select the audio source device you require (you may have different devices than the one shown in the example below). You can also change between different audio sources throughout the lesson.
Video Source: Your default camera will be selected here already. If you only have one camera this menu will be greyed out. If you have a second camera, please ensure that it is connected via USB before you start your browser and enter the classroom. You can then select the camera you wish to use from this menu, or use the ‘Toggle Video Input’ button to switch between cameras during the lesson.
Toggle Video Input - Click this to switch between cameras, if you have more than one.
Please note that as soon as you enter the Online Classroom, your audio and video streams will be ‘live’ and the other people logged into the session will be able to see and hear you, even if you cannot see and hear them.
Step 3 - Leaving the Online Classroom
When your lesson is finished, it’s easy to leave the online classroom - simply close the window/tab in your browser.
Your teacher might send some notes through your inbox chat window about what to practise or some tips to remember. You’ll receive an email notification if they do, so don’t worry about keeping everything open!
And that’s it! You’ve taken your first online lesson!
Need more help?
Please contact your music service / hub for more information.