Guide to the Audio Settings in the Online Classroom
Audio Settings in the Online Classroom
In the Online Classroom there are several new options to control the audio that you are sending into the session including toggles for Auto Gain, Echo Cancellation and Noise Suppression.
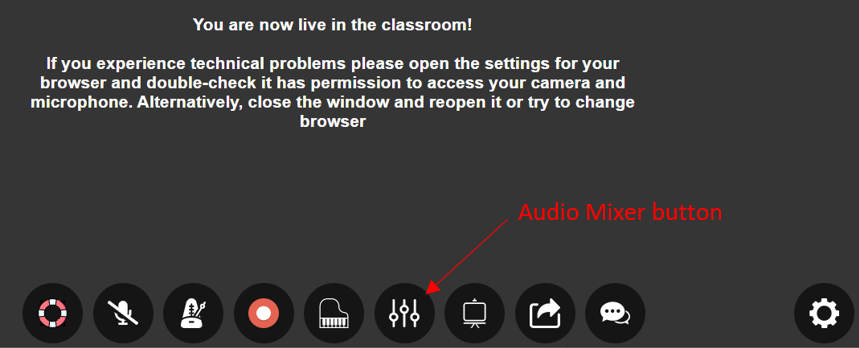
As part of this change, we have moved the Audio Source menu to a new button called Audio Mixer at the bottom of the classroom. Previously the Audio Source menu was located in Media Settings, which was reached using the Settings gear icon in the bottom right.
In the Audio Mixer window you can adjust your Audio Settings for the Online Classroom as follows. These settings only apply to the audio you are sending into the classroom. So to adjust the quality of the audio you are hearing from other users, you will need to be prepared to guide them through these settings on their device.
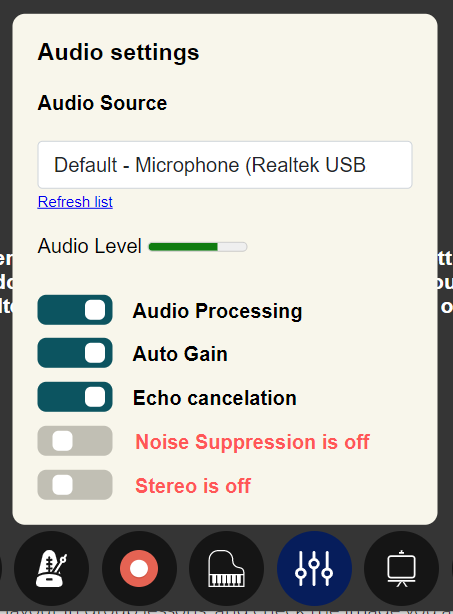
Set your Audio Source – this drop-down menu will show all the available audio input devices such as microphones, including USB webcams with built-in microphones, built-in microphones on your laptop or tablet, USB or Thunderbolt audio interfaces, USB-equipped microphones etc. Ensure any external audio devices are connected and switched on before you start your browser - you may need to refresh this list with the link "Refresh list" below the drop-down menu after granting new permissions to allow use of mics and cameras in order for your audio device(s) to appear in this list.
Check your input Audio Level – if you are successfully sending audio to the classroom you will see a green bar moving when you speak / play into the input you selected as your Audio Source.
Adjust the Audio Processing applied by the classroom - there are 5 toggle switches as follows:
-
Audio Processing – this turns on or off all three audio processors – if this setting is switched off, there will be no auto gain, echo cancellation or noise suppression applied by the Online Classroom. If you are an advanced user with an external audio interface, mic and headphones, you should consider turning this off so you are in total control of the audio you send into the classroom with your additional equipment. If you wish to disable only some of the processors, this switch needs to be ON so you can adjust the settings below independently.
-
Auto Gain – if this is turned on, the Online Classroom will attempt to adjust your input volume to ensure a loud signal is sent to the session without distorting the sound. Users who play loud or very dynamic instruments may wish to turn this off to prevent the session from aggressively reducing the volume of loud phrases and thus destroying the dynamics. Be aware if you do turn this off, you need to pay particular attention to the gain structure on the equipment you are using, especially your microphone preamp gain, to ensure a loud enough signal is sent to the classroom without distortion.
-
Echo Cancellation – if this is turned on, the Online Classroom will attempt to eliminate echo caused by using loudspeakers instead of headphones, or by the internal audio drivers on some devices. If you are using an internal audio device like the built-in microphone on your laptop or tablet, you must leave this turned on or you may cause an echo for the other users in the session, even if you are using headphones. Advanced users who are using an external audio interface, mic and headphones may wish to turn this off to further improve the quality of the sound they are sending to the session.
-
Noise Suppression – if this is turned on, the Online Classroom will attempt to eliminate background noise from your input signal. This is turned off by default because the way in which this processor works will tend to detect musical sounds as noise and attempt to eliminate them (the processor is designed to enhance human speech). This will cause poor audio quality for musical sounds and nearly everyone using the Online Classroom will benefit from leaving the Noise Suppression process turned off. Be aware that some operating systems also have Noise Suppression features which are often enabled by default. So, you may also wish to locate and disable the Noise Suppression in your system settings – how to do this varies from device to device and you can contact us for further guidance if needed.
-
Stereo – if this is turned on, the Online Classroom will send a stereo signal to the session. This can be useful for people who are sending recorded music into the classroom where the stereo information is important – for example if a Music Production tutor is teaching a student about panning and other stereo effects during mixing. Be aware that this will use considerably more bandwidth than if turned off (i.e. sending only a mono signal into the session), so we do not advise using Stereo unless A. you know that you need to and B. have good quality broadband connections at both ends of the session with at least 2Mbps download and 2Mbps upload bandwidth.
All of the above settings will revert to their default settings every time you enter an Online Classroom session, including if you just refresh the page. So, if you have a desired configuration that differs from the default settings you need to remember to adjust the settings accordingly at the start of every lesson and after every refresh of the page.
For further information or if you need help adjusting your settings please email us at: [email protected]
You may find our online classroom guides helpful:
Student's Guide to the Online Classroom- Getting Started